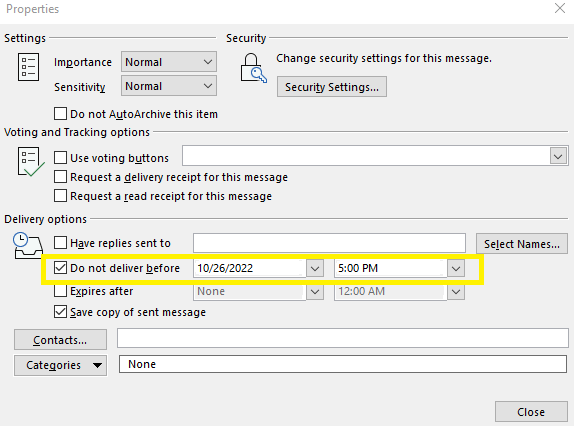
Who hasn’t heard the adage, ‘Timing is everything.’ This definitely applies to business work and when you want to send an email. As you may have noticed, over the past couple of years Microsoft has been providing new features within Office 365 and Office installs to help you manage your company content when it is convenient for you. For example, Microsoft has provided the Microsoft Office Mobile apps (Intro to Microsoft Office Mobile Applications) and the Microsoft Lens App (How to Scan Documents with the Microsoft Lens App ) to help you with your busy work life. With that being said, we wanted to introduce you to scheduling email messages to be sent at a later time with Outlook. This allows you the flexibility to write an email but postpone sending it for a more appropriate time. Below are the steps to do this, but keep in mind that Outlook needs to remain open on your computer when the message is scheduled to be sent. We recommend that you make sure your computer does not go to sleep and leave Outlook open and running but simply lock your computer screen (to do this, select the ![]() Windows and "L" keys on your keyboard simultaneously). If the computer or Outlook is not running at the scheduled time, the message will be sent the next time your computer can connect to your email server.
Windows and "L" keys on your keyboard simultaneously). If the computer or Outlook is not running at the scheduled time, the message will be sent the next time your computer can connect to your email server.

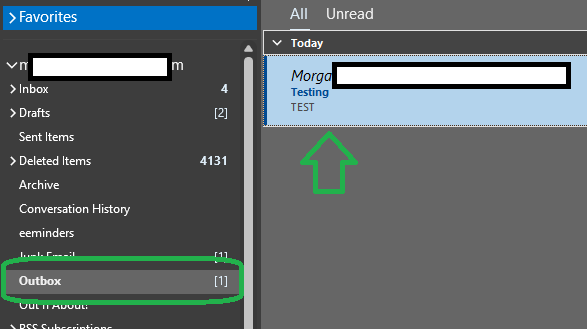
What if things change quickly and now you need to send the message out immediately?
Here are the steps you can follow: